Banh Mi recipe

We love banh mi so we decided to make one today at home. Sadly, we do not have authentic Vietnamese Banh Mi bread at home so we just opt for store bought baguette. If you want authentic banh mi, our friend makes some. Check them out.

Anyway, I just want to show you the banh mi we made. All you need are the following:

Ingredients

  • Baguette
  • Liver Pate (click the link for the recipe)
  • Cilantro
  • Some leftover pork we pulled into strands
  • Carrot and Daikon pickles (click the link for the recipe)
  • Sriracha (optional)

Instructions

  1. Preheat toaster for about 2 minutes. Toast the bread for 2 minutes, open faced, outer part facing up so that the crust becomes a bit crunchy.
  2. Assemble as such.
Liver pate and pulled pork first
Add the pickles
Garnish with cilantro. I realized that it’s better to remove the stem. It’s hard to chew. Add some sriracha if you want.

Enjoy!!

The Bouncing Tigress

Do Chua (Daikon and Carrot pickles)

My friend makes great banh mi sandwiches and I’d always love to have lots of vegetables in it. For now, I want to have these in my fridge so that I can add them in my banh mi if ever I have one or use as condiments for any Vietnamese food.

I researched online and varying ratios have been suggested but for this recipe I tried using a 2:1:1 (water, sugar, vinegar ratio). I found it a bit too sweet for my taste. I suggest you lessen the sugar next time. I also don’t know how long this will last in the fridge.

Do Chua (Daikon and carrot pickles)

Ingredients:

  • 250 carrots, julienned
  • 250 grams daikon, julienned
  • 1 cup warm water
  • Half cup sugar (I suggest you lessen the sugar because I find this too sweet for my taste)
  • Half cup vinegar
  • 1 tablespoon salt

Instructions:

  1. Sprinkle salt on the julienned vegetables. Set aside for 15 minutes.
  2. Wash the veggies in water to wash excess salt.
  3. Place the drained vegetables into a glass container.
  4. In a separate bowl, dissolve the sugar into the warm water. Add in the vinegar. Mix.
  5. Place solution into the jar with the vegetables.
  6. Leave overnight. Enjoy the next day.

The Bouncing Tigress

PAD THAI OMELETTE X SILKWAY FRYPAN

We had this packet of Pad Thai mix my sister bought from Bangkok. Behind the packet, it showed how to make an omelette style Pad Thai so let’s do it! For this recipe, I’m using the following and also my tool right now: SILKWAY FRYPAN.

PAD THAI

Ingredients:

  • 250 grams shrimp
  • 1 piece tofu, diced
  • 2 eggs, scrambled
  • 100 grams of dried vermicelli
  • 100 grams bean sprouts
  • Spring onions (since I don’t have chives)
  • 1 pack of the pad thai mix
  • Roasted peanut (included in the mix)

Instructions:

Make the omelette first. Cool and set aside. Check out the video below on how I did the omelette using SILKWAY FRYPAN. I loved it because for a delicate item like this, it came out in piece and note that this is just the first try. No repeat takes done on this.

It was not that easy to scrape off the thin edges because I’m using a rubber spatula. I realized, it helps to cool the pan before cleaning and better to clean by wiping with a paper towel.

  1. Soak the dried vermicelli in warm water until soft. Set aside.
  2. In the same pan, heat oil and saute diced tofu until browned on all sides.
  3. Add in the prawns and beansprouts and saute a bit.
  4. Add the Pad Thai mix and softened vermicelli noodles.
  5. Mix everything.
  6. For serving, place a good amount of pad thai onto the omelette, fold into a square, flip and cut open with an X shape opening.
  7. Top the pad thai with some roasted peanuts, spring onions and lime (if you have).
  8. Serve hot.

Enjoy!

The Bouncing Tigress

Steamed Bangus (Milkfish) in banana leaves

I’m looking forward to cooking healthier and that means less oil, salt and healthier tools for cooking.

We always fry our bangus and I was thinking of a new way to enjoy bangus without the oil. Since the bangus isn’t boneless, I think it’s better to use this recipe.

I got this recipe from Panlasang Pinoy and wanted to try it. I just didn’t follow as is but more or less the same.

Here is how I did the recipe:

STEAMED BANGUS (MILKFISH) IN BANANA LEAVES

Ingredients:

  • 2 big whole bangus, butterfly cut
  • 2 small tomatoes, chopped
  • 1 medium onion, chopped
  • 1 clove garlic
  • 5 tablespoons Soy sauce
  • Pepper
  • Banana leaves enough for wrapping

Instructions:

1. Mince the garlic and fry in a pan. For this, I used my Silkway frypan to fry my garlic bits using less oil. Set aside.

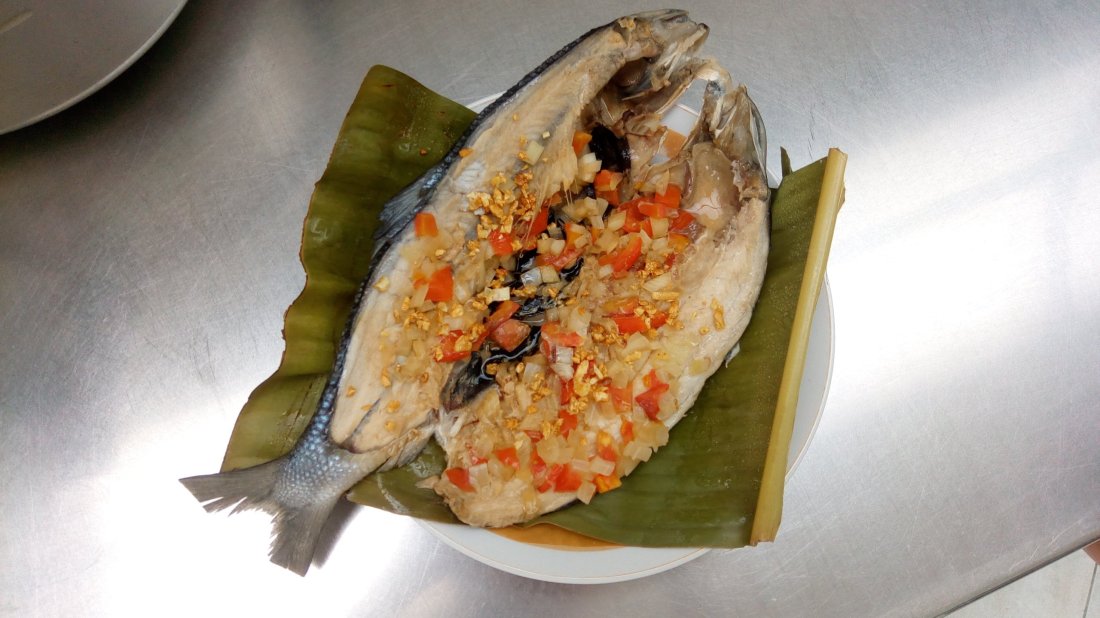
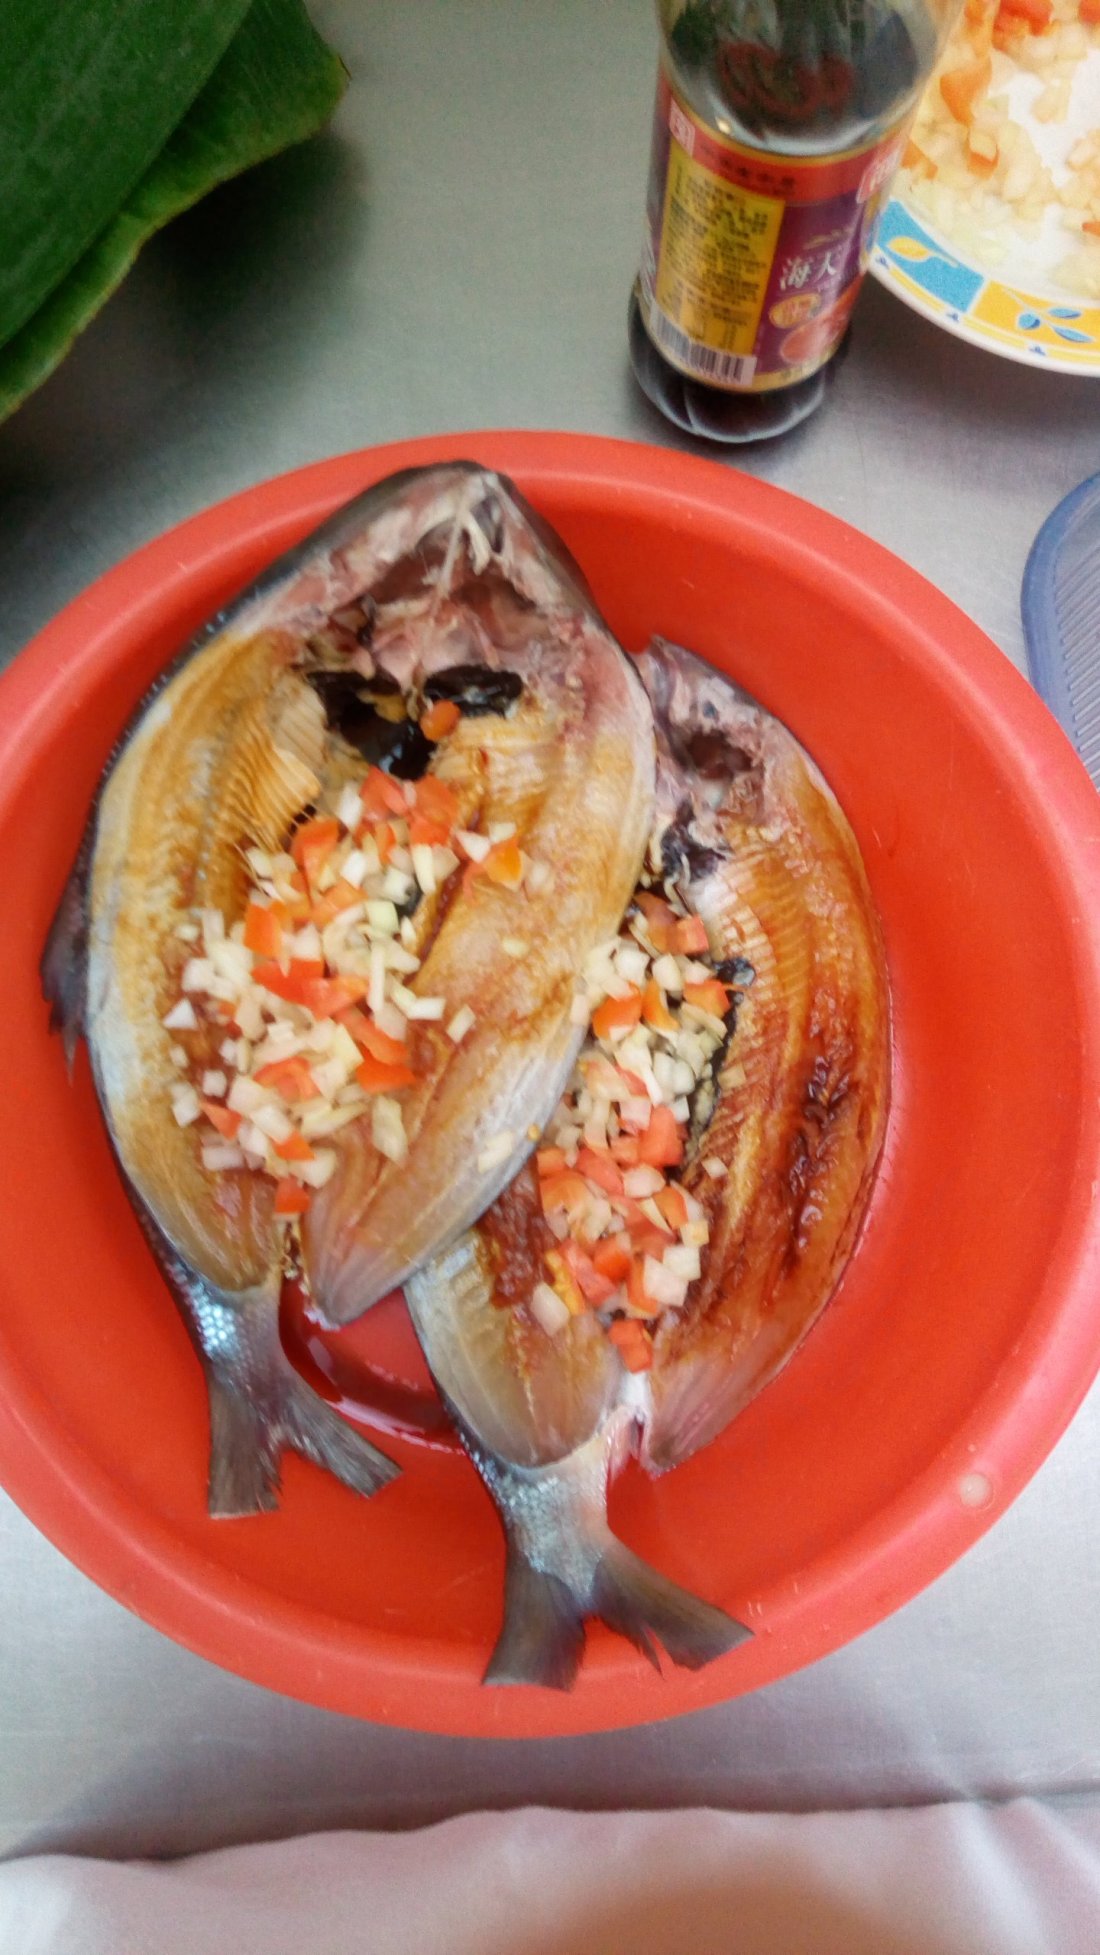
2. I opened the bangus pieces and placed the tomatoes, onions, and drizzled the soy sauce and pepper.

3. I wrapped the bangus in banana leaves and steamed them for around 15 to 20 minutes. Mine was a bit frozen so I reached 20 minutes.

4. Serve and top with fried garlic bits.

Enjoy!

The Bouncing Tigress

Cheesy chicken pesto x SILKWAY FRYPAN

I am privileged to try Silkway’s nonstick frypan that is laminated and not spray coated. Before I expound on the technicalities, which I will blog on a separate entry, I want to dive in first with my firsthand experience cooking with it. Prior to this recipe, I pretreated the new pan by heating it up for a good 10 seconds and removed it from the heat and wiped vegetable oil on it. Afterwhich, I wiped the oil off for me to cook my dish.

So I thought of making cheezy chicken pesto from leftovers in our kitchen pantry and I want to try the “nonstickiness” of the frypan by not adding any oil at the start to see if the chicken sticks.

Tools for the battle, recipe below
Chicken thighs were added on the Silkway frypan without adding any oil. No chicken stuck to the pan.
After frying the chicken, not surprisingly, some crusting was formed on the frypan but it was very easy to wipe! I did around 2 to 3 wipes for this to be completely clean.
TADA!!! Cleaaaaaannnnn.
After wiping, we put back the chicken with the pesto.
Then we added the grated mozzarella cheese and cajun seasoning.
We then put a lid to allow the cheese to melt.
I transfered the dish into a serving dish and literally, the chicken just slid into the serving dish. It was totally nonstick aside from the fact that pesto had a lot of olive oil in it.
Wiped it clean. Yeahba!
So this lovely recipe is brought to you by The Bouncing Tigress x Silkway 🙂

CHEEZY CHICKEN PESTO

Ingredients:

  • 500 g chicken thighs
  • 2 tablespoons apple cider vinegar
  • 1/2 cup homemade pesto
  • 1/4 cup mozzarella cheese, grated
  • 1 tablespoon cajun seasoning
  • Salt
  • SILKWAY 28 cm frypan (stainless handle)

Method:

  1. Marinate chicken in a bit of salt and apple cider vinegar. Set aside.
  2. Add the chicken slices, skin side down, onto the SILKWAY frypan and turn up the heat. Allow the excess fat to render and for the chicken to brown slightly.
  3. Remove the chicken pieces from the pan. Discard and pour out the excess fat from the pan. Wipe the frypan with kitchen napkin.
  4. Place the pesto onto the frypan and heat. Add back the chicken slices until thoroughly cooked.
  5. Top each chicken with some grated mozzarella cheese and sprinkle with some cajun seasoning. Put a lid on the frypan to melt the mozzarella.
  6. Serve hot.

My personal opinion on the SILKWAY frypan.

  1. I liked it because it was really totally nonstick. It was very easy to clean although the environmentalist in me does not promote using kitchen towels all the time. It was just to show how easy maintenance it was. I’d still wash mine with a sponge and soap after it cools down.
  2. I was a bit panicky at first because it looks so precious I didn’t want to make any scratch on it. I used a wooden spoon for this dish.
  3. It wasn’t that heavy, though it wasn’t that light either. I believe the weight was just right, enough so that when you stir the food in the frypan, you don’t need to hold the frypan everytime.
  4. I find that the handle doesn’t heat up that much even in a large fire on the frypan. Some pans I still need the use of a potholder but for this one, I can pick up the handle with my hands.
  5. I have yet to try cooking dishes with 0 oil. Since it promotes healthy cooking because of less oil usage, I want to try this feature for other kinds of food.
  6. Note that even with the cheese I used, it didn’t stick to the pan but I’m sure the olive oil from the pesto also helped make it glide nicely out of the pan. We can test using other foods without any oil in the future.
  7. For the technicalities of the frypan, I shall blog about it separately next time.

Thank you and I hope you enjoy this recipe!

The Bouncing Tigress

Southern fish fry bites

This is not my own version. I just saw this recipe from videos in YouTube. I just attempted to try it using the pangasius fillet we have at home. This was served in our thanksgiving party at the office and it was a hit!

Ingredients:

Coating:

  • 6 pieces large pangasius fillets or cream dory, cut into pieces
  • 1.5 cup polenta
  • 3 tablespoons McCormick Cajun seasoning
  • 1 teaspoon garlic powder
  • 1 teaspoon onion powder
  • Pinch of salt
  • Pinch of black pepper
  • Yellow mustard

Aioli:

  • 1 cup mayonnaise
  • 3 tablespoons fresh minced garlic
  • 1/2 teaspoon salt
  • 1/2 teaspoon black pepper
  • 1/4 cup water

Instructions:

  1. Pat dry fish fillets and coat with yellow mustard. Mix all dry ingredients and coat the fish with the dry mix.
  2. Mix all aioli ingredients. Set aside.
  3. Heat oil and fry each fillet until golden brown.
  4. Serve with aioli.

Hope you guys enjoy! 🙂

The Bouncing Tigress

Berry flavored Brownie with spicy chocolate tea infusion

Not all blogs would post about a failed recipe but here I am posting one. I won’t really say that it’s a failure completely but because of texture, it doesn’t meet my standards.

Why I made a brownie is really because I had items in the pantry that I don’t know how to use or I dislike to consumer by themselves. What I wanted to dispose really was the Caffe D Vita mixed berry drink primarily because I find it too sweet. And just right, we had tablea to counter the sweetness. Also, we have lots of tea in the pantry and I wantes to make use of this Kusmi Tea, spicy chocolate flavor.

I researched recipes online and tweaked it to incorporate these since they’re not common to brownie mixes.

If you can see, there’s a bit of marbling on the surface. It’s because I attempted to make 2 kinds of batter and supposedly to mix the two in swirls to create an artistic effect and also to combine flavors of each batter separately.

So here, I’m going to share the recipe but I’ll also suggest some tweaking after I tasted them.

Berry flavored brownie with spicy chocolate tea infusion

Ingredients:

1st batter:

  • 2 oz chocolate tablea
  • 1.5 oz white chocolate tablets
  • 1/4 cup milk
  • 3/4 cup water
  • 1 cup Caffe D Vita mixed berry flavor
  • 1/6 cup sugar
  • 1 cup Queensland butter
  • 1/4 tsp baking powder (purists don’t add this but I felt I needed this since this is not an ordinary recipe.. just in case!)
  • pinch of salt
  • 2 eggs and 1 egg yolk
  • 1/2 cup flour

2nd batter:

  • 3 oz white chocolate tablets
  • 1/2 cup milk
  • 1/2 cup water
  • 6 g Kusmi tea leaves, spicy chocolate flavor
  • 1 egg
  • 1/4 cup flour (suggested tweaking, replace with only 1/8 cup flour)

Instructions:

  1. For the 1st batter, melt the tablea in the milk and water. Add the Caffe D Vita powder and sugar and let mixture boil until reduced to about 2 cups of liquid. (I honestly just trusted my gut on this if I have reduced enough liquid.)
  2. Remove from heat and allow to cool a bit. While stirring the mixture, add the eggs and egg yolk one at a time while stirring to prevent them from cooking in the batter. Melt the butter into the mixture. Then add the salt, baking powder and sifted flour. Mix until combined. Don’t overmix. Set aside.
  3. For the 2nd batter, boil the tea leaves (I placed it in a metal cylinder to filter off the leaves) in the milk and water for about 2 minutes. Remove the metal cylinder then melt the white chocolate into it. Reduce to about a cup. (Gut feels again).
  4. Remove from heat. While stirring, add the egg to prevent from cooking and add in the flour. (You can try the 1/8 cup tweaking instead).
  5. Preheat oven to 180 degrees Celsius.
  6. In a 8 x 8 greased baking tray, pour in the chocolate batter first. Then pour in the 2nd batter artistically. Main goal was to create some web but I failed. Oh well.
  7. Bake for about 40 minutes to an hour. Some recipes said 25 minutes is enough but it was still wet by then.
  8. Once middle portion is completely baked by testing with a toothpick, take out from the oven and let it cool.
  9. Once cooled, cut into squares and store in the fridge. Eat chilled.

Insights:

  1. Since I used chocolate tablea which essentially lacks the fat from the cocoa butter, I added the egg yolk for more moisture. It worked and also because I added in butter.
  2. The baking powder caused my entire brownie to rise midway, creating a lot of uneven puffing up and cracked the surface. Eventually, the air pockets died down and still created a flat surface so it was still ok for me to add it even if purists are against it. I just added it because I’m afraid the brownie may become too dense because of the added egg yolk.
  3. My flour for the 2nd batter was too much that it was dense so when I poured it into the 1st batter, it sank, creating a bottom layer full of the 2nd batter.
  4. The taste of the Caffe D Vita was too artificial and it imparted somewhat of a chemical taste that I needed a way to hide it so I added the white chocolate tablets into the 1st batter. It kind of worked.
  5. I liked the taste of the 2nd batter better and the 1st batter had the bitter traces from the Caffe D Vita but thankfully, when I mixed the two batters, the final outcome’s taste was a beautiful combination. No more bitterness. My mom said it smelled and tasted like candy. Very interesting indeed.
  6. The Caffe D Vita had a lot of sugar in it so I used it as my sugar for the 1st batter. I still added sugar to hide the bitterness of whatever chemical is in the artificial flavor.

So far, not bad for my 1st brownie attempt. I was praying to God while doing it because I certainly am not a baker but I just applied what I know in chemistry and math.

Hope you guys learn from my mistakes. Happy cooking and baking!

The Bouncing Tigress

Homemade vegetable lasagna

This is my first attempt in making lasagna although I’m not new to cooking. I’ve bought some instant lasagna sheets that can be assembled readily without pre-boiling them.

Size of sheets are 4.75 x 6.5 so better use a baking dish with size 8 x 10x 3

Sorry I wasn’t able to take a photo of the unopened version of the mozzarella log.

I tried skipping all the unhealthy ingredients like bechamel and butter to lessen the guilt. I also skipped adding meat since I know I’ll be using lots of cheese already which is also protein and fat! =) mwahahhaa

Tomato and eggplant lasagna

Preparation time: 20 minutes

Cooking time: 40 minutes

Serves 6

Ingredients:

  • 250 g BALDUCCI large instant lasagna sheets
  • 1/4 cup olive oil
  • 3 canned tomatoes
  • 4 long eggplants
  • 2 tablespoons balsamic vinegar
  • 5 tableapoons tomato paste
  • 1 bulb of garlic, minced
  • 1 small onion, minced
  • 3 pieces cloves, toasted and ground
  • 1/2 teaspoon cinnamon
  • 1 kg NAPOLI mozarella log, grated (you will use about 700 g only)
  • 2 teaspoon salt
  • 1 teaspoon sugar
  • 1 cup chopped fresh basil

Instructions:

  1. Broil eggplants on the stove top and burn until blackened and easy to peel. Chop and set aside.
  2. In a sauce pan, heat the oil, saute the garlic, onion, cloves and cinnamon.
  3. Add the canned tomatoes, balsamic vinegar, chopped eggplants, tomato paste, salt, and sugar. Simmer until slightly reduced. Remove from heat and mix in chopped basil. Set aside.
  4. On a 8 x 10 x 3 baking dish, put some of the tomato mixture. Layer with the 1st lasagna sheets, then add more of the tomato mixture, add the grated cheese, freshly ground black pepper. Now onto the second layer and so on. Make sure to finish the entire box of lasagna sheets until you make 4 layers. The topmost layer should be the grated cheese on top of more tomato mixture. Top with lots of black pepper.
  5. Pre-heat oven to 200°C and bake it for 40 minutes covered. Then I removed the cover towards the end if I want my mozzarella slightly browned and my lasagna drier.

For the layering according to the first thing to add into the dish (summary).

  1. Tomato mixture
  2. Lasagna sheet
  3. Tomato mixture
  4. Grated cheese and black pepper
  5. Lasagna sheet
  6. Tomato mixture
  7. Grated cheese and black pepper
  8. Lasagna sheet
  9. Tomato mixture
  10. Grated cheese and black pepper
  11. Lasagna sheet
  12. Tomato mixture
  13. Grated cheese and black pepper

It’s not that firm because I didn’t use any bechamel sauce butI just relied on the mozzarella to try to hold the sheets together. It wasn’t so bad in terms of firmness. Hope you enjoy this recipe as much as I did. 🙂

*note that the recipe was already tweaked since I used a wrong size of baking dish.

Love,

The Bouncing Tigress